How to Make Realistic AI Videos as a Beginner (BEST Tips and Tricks)
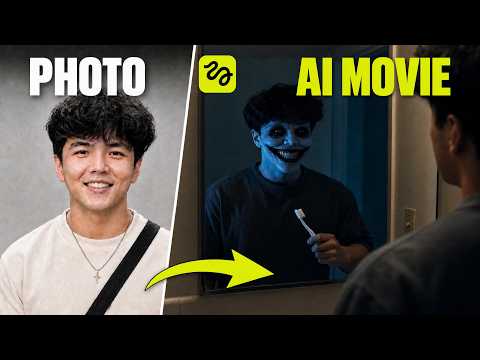
A photo can establish who belongs in an AI video. It cannot, by itself, tell the model who is speaking, which person is the enemy, or where the camera should be during a fight. Those missing decisions are where a plausible-looking scene starts to fall apart.
Watch the full beginner tutorial to compare the first and revised action scenes, the product story, a direct-to-camera review, horror direction and a character swap. This guide follows the complete November 11 video. Its advice is source- and documentation-reviewed; we have not generated a new set of clips for the article.
The video promotes Higgsfield through this creator link. Any first-purchase offer depends on the current terms at that destination. Check access to the models you intend to use before buying a plan.
Before you start
Prepare a clear photo of yourself or a character you may use, a clean voice recording if you want a particular voice, and any product or location references the scene needs. For motion transfer, you also need a source clip you are allowed to adapt. Keep the original files so a failed generation does not become your only reference.
The demonstrated workflow uses image generation for character preparation and Seedance 2.5 for scenes. The narration names GPT Image 2.5 Flare and Sunburst; the official video description clarifies that the updated gray character sheets shown used GPT Image 2.6 Sunburst. These are the labels in this source, not a requirement to substitute one model version for another.
Current Higgsfield Seedance documentation explains reference-based generation. Check the selected model’s supported inputs and quote in the actual interface. The useful principle survives a menu change: identity, location, action and voice need separate, understandable instructions.
Make a character sheet you can inspect
Begin with a photo where the face is visible. In Image, upload it and request only the preparation you need, such as a cleaner background or more even exposure. Inspect that result before using it to create additional views. An attractive cleanup that changes the person’s face is a poor identity reference.
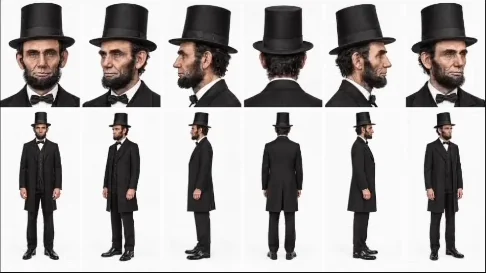
The character preparation at 1:30 moves from a portrait to a full-body image and then a sheet. The suggested full-body frame is 3:4; the sheet is 16:9 and contains a face close-up, front view and back view. These serve different purposes. The close-up shows facial detail, while the full-body views show clothing and silhouette.
Use a neutral gray background with soft, even lighting when it makes the character easier to distinguish. In the video, light clothing and bright highlights are harder to inspect against white. Gray is a practical contrast choice, not a guarantee that the character will remain identical through every generated frame.
Check the views against each other. Are the hairstyle, jacket, shoes and proportions consistent? If the back view invents a different outfit, correct the sheet now. Make a separate approved sheet for each deliberate wardrobe change, rather than allowing the model to improvise clothing between shots.
A suggested preparation prompt is:
Use the attached character as the identity reference. Create one sheet with a face close-up, full-body front view and full-body back view. Keep the same outfit and proportions in all views. Use a neutral gray background and even light so clothing edges are clear.
This is an adapted exercise prompt. Review its output; the wording does not certify identity preservation.
Assign the voice to the right person
The video creates a custom voice through Audio → Text to Speech, using a clean recording and a named voice. The official avatar guide documents the custom-voice entry point. Check the cost before creating it and listen to the result before using it throughout a longer scene.
Keep the audio file available as a reference. In the video prompt, state which character uses that voice. If two people appear, “use this voice” is ambiguous. “The hero uses the attached voice; the companion has no dialogue in this shot” gives the generation a clearer assignment.
Voice identity and speaking style are separate. A voiceover can sound like you while the visible character never speaks to the camera. If the scene requires a talking review, specify direct address, the lines and the moments where the camera cuts away. That distinction becomes important in the product examples below.
Direct the scene with named references
Open the video generator, choose the intended model and attach the references. The demonstration uses the @ reference picker to bind uploaded assets to roles. Give each a job: hero, companion, enemy, location or voice. Avoid mentioning a file loosely when you can select the actual uploaded reference.
The action example takes place on a bus. A useful plan needs to say where people stand, who initiates the confrontation, how the hero responds and what the camera shows. You can ask an assistant to draft that plan, as the video suggests, but read it for physical contradictions before generating.
For a first attempt, the video suggests a 15-second scene and lower-resolution exploration; its longer example uses 30 seconds. Treat those as the source’s choices, then verify the controls and quoted cost for your selected model. A shorter test makes it easier to locate a failure and cheaper to compare a revision.
Separate action from camera instructions. “The hero grips the pole and steps around the attacker” describes subject movement. “Cut to a wider view that keeps both characters visible” describes how the viewer sees it. A close-up that hides the movement cannot demonstrate the choreography you asked for.
Repair the bus fight by separating identities
In the first action result, some enemies resemble the companion. The revision gives the three enemies their own images and fixed roles. It also specifies a slow-motion hit, knockback, camera changes and use of bus poles and seats in the action.
This is a concrete repair strategy: when identities blend, supply distinct references and assignments. Repeating “make the faces consistent” leaves the model with the same ambiguous cast. After the revision, inspect every person during the fastest motion and near the end of the clip; a correct opening frame is not enough.
The revised result is easier to follow in the source, but it still needs inspection. The video also recommends a location sheet because seats, windows and poles can drift between shots. Use a few clear views of the same bus interior, and preserve its layout when changing the camera angle.
Keep a short review note for each attempt: which face changed, at what moment, and whether the camera hid a required action. Change the corresponding reference or instruction before rerunning. If you change cast, location, duration and camera style at once, you will not know which revision helped.
Turn the same character into a product story
The product example reuses the character and voice, adds a sample salt-brand reference and gives the ad a small domestic story: looking in the fridge and making food. That gives the product a reason to appear. It also creates more things that can go wrong, including hands, appliances and packaging.
The source calls out a blender behaving unnaturally without an electrical plug. It also notes that most of the delivery becomes voiceover. Those are different problems. A better appliance action needs a physical continuity correction; a more direct presenter needs a change in shot and speech direction.
For the next example, the prompt asks for natural speaking to camera with cutaways showing the explanation. The product changes to sea-salt spray, and the result includes hair demonstration shots and sound effects around the cuts. Watch the UGC and review comparison before choosing the format for your own brief.
For a practical exercise, describe one approved product use, one visible action and one closing sentence. Check the label and package shape in every readable shot. Generated product footage is a creative demonstration; it does not establish that a product performs as claimed or that an ad converts. Use approved factual copy rather than allowing the model to invent benefits.
Plan the sound of a horror scene
The horror example relies on atmosphere, quiet tension and a sudden sound impact. Include those decisions in the brief instead of leaving sound until the end. Decide which moment should feel quiet, where the audience should look, and when the impact should land.
Listen without watching once. If the sound announces the surprise too early, an impressive image may still fail to create suspense. Then watch with sound and check whether the event and impact coincide. This is an editorial review exercise based on the source’s sound-direction advice, not a measured comparison of audio models.
Start from a source clip when the motion already works
For a character swap, the recording opens Genjutsu, chooses a community motion and replaces its character reference. Current Genjutsu instructions distinguish Motion transfer from Objects swap. Select the mode according to what should change and what should remain from the source.
Some presets in the video return a protected-content message. The presenter describes a face-blurred copy that went through, then explicitly warns that blurring does not give permission to use someone else’s video or music. That isolated result does not establish how the model detects content, nor does it make attribution a substitute for permission. For a repeatable workflow, start from your own or otherwise authorized footage and choose another source if a preset is blocked.
Compare the remake with the source for motion, timing and unwanted retained material. The full Genjutsu guide and Katana repair guide cover more detailed examples when a single swap is not enough.
Troubleshooting before the final export
If a face changes, inspect the reference sheet and role assignments. If the setting changes, add a consistent location reference. If the wrong person speaks, bind the voice to a named character. If a review becomes voiceover, request direct-to-camera speech and specify the cutaways separately.
If a prop behaves impossibly, isolate that action in the revision request. If a product label changes, compare against the approved image rather than accepting a plausible replacement. If a clip works at the start but breaks near the end, review the entire duration before deciding it is ready.
For tighter control, the video points toward Blender planning, After Effects compositing, Premiere editing and HyperFrames. The Higgsfield workflow hub explains where each fits. Return to the exact beginner video to judge the revisions in motion: the useful lesson is the connection between a visible failure and a specific change to the brief.