Can HyperFrames Replace After Effects? I Tested My Own Videos

A useful first HyperFrames project is a short explanation you have already recorded. Keep the voice, bring in the screen recordings or images that support it, and ask your coding agent to build the graphics around what is being said. You should finish with an editable composition and an exported clip you can inspect against the original material.
This is also a manageable way to compare HyperFrames with After Effects. Use the same inputs and a specific editing task: five project cards that appear when they are named, or a diagram that explains which tool does which job. A fast render tells you little if the viewer cannot follow the explanation.
The worked examples here come from two Superbash tests: a 25-second recreation of an existing Sol versus Astra sequence and a roughly 21-second explanation of an Opus/Unreal game workflow. They show the construction and review process, including the revisions. The command examples below are checked against current HyperFrames documentation; they are added setup guidance, not a claim that a new edit was rendered for this article.
Before you start: choose one explanation and gather its inputs
Pick a passage with a clear beginning and end. Twenty to thirty seconds is enough to test footage, text, a few timed reveals and audio without creating an entire episode’s worth of revisions. Listen to the passage before choosing a visual style. Write down what the viewer needs to understand at each point.
For a recreation, gather the original presenter recording, its narration, the project footage and the existing finished edit. The finished edit is the comparison reference. The separate recordings are the material from which the new composition is built. Feeding the flattened finished video into a player would preserve its appearance, but it would not give you editable project cards or labels.
For a new explanation, gather the evidence first: the relevant app recording, the generated artwork, the result inside the target application, and any labels needed to connect them. Keep the original filenames and note which section of each recording is useful. A folder full of vaguely named videos makes it easy for an agent to pick a visually plausible but irrelevant moment.
Use a short preparation table:
| Narration cue | What the viewer should see | Source to supply | Check |
|---|---|---|---|
| A project is named | Its card and a recognizable result | That project’s recording | The correct project appears at the spoken cue |
| A model setup is explained | Labels plus the relevant previews | Setup capture and project footage | Labels remain readable while previews move |
| A tool’s role is explained | The tool and its output | App capture plus resulting asset | The relationship is explicit |
| A detail is discussed | A tight view of that detail | Original high-resolution capture | The crop preserves the evidence |
This table is a suggested planning aid. Fill its timings from your own recording; the source video’s publication timestamps are not the timing of your new composition.
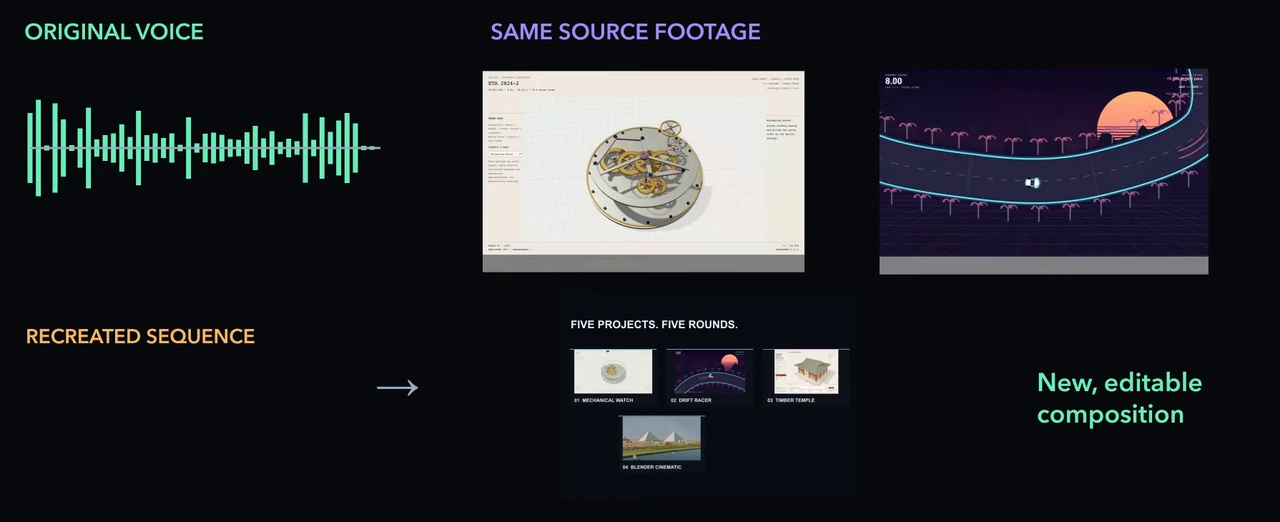
Decide whether you are preserving the existing soundtrack. Both source tests retained recorded narration and used existing footage. The second required neither a generated presenter nor a replacement voiceover. There is no reason to add either just to use an AI editing tool.
Set up a local composition the agent can edit
For local work, HyperFrames requires Node.js 22 or later and FFmpeg. You also need an AI coding environment that can read the project files and the HyperFrames skills. Check the dependencies in your terminal:
node --version
ffmpeg -version
The official quickstart documents those prerequisites. Use your platform’s normal installation route if a dependency is missing, then repeat the version check. These checks establish availability, not whether a particular composition is ready to render.
Create a separate project directory and install the skills for your coding environment:
npx hyperframes skills
npx hyperframes init narrated-clip
cd narrated-clip
The current HyperFrames CLI guide documents project creation and the edit/check/render loop. Follow any prompts in your installed version. For the installed version’s options, use npx hyperframes init --help. The skill installer is documented in the project’s scaffolding reference.
HyperFrames stores the composition as HTML, CSS and animation code. In its current authoring convention, index.html is the root, scenes live under compositions/, and local media lives under assets/. The agent needs to load the HyperFrames authoring skill before changing these files. It contains timing and media rules that a generic web-page generator will not know. See the official authoring skill.
The practical difference from an ordinary website is time. A card must have a defined entrance, visible duration and exit; a renderer must be able to seek to a frame and get the expected state. Random movement, live network content or a timer that happens to fire during playback can break that expectation. Let the agent use the framework’s timeline conventions rather than improvising a browser animation that only works when played from the beginning.
The Superbash tests used Codex with the HyperFrames skill and a local browser preview. The new desktop assistant’s drawing and commenting controls were explicitly untested. You can evaluate the file-based workflow without treating those separate controls as a demonstrated feature of these tests.
Give the agent a timing brief, then review one pass
Describe the desired explanation before requesting animation. A useful brief identifies the source recording, the content that must remain editable, and what a viewer should understand. For example:
Build a short explanation around this narration. Preserve its wording and timing. Reveal each project card when its name is spoken, using the supplied footage for that project. Keep labels editable. Crop recordings to the relevant result, and keep the presenter inset clear of labels. Show me the composition before the final export.
That is an adapted starting brief, not the exact prompt used in the source. Replace the general references with your filenames and measured cue times. If you want a close recreation, supply the old export as a reference and identify the details that must match: font, card order, preview start frames, spacing and reveal timing.
Ask for one complete first pass of the chosen passage. Reviewing a complete twenty-second explanation is more useful than polishing its opening card while the remaining scenes do not exist. Watch it with sound, then pause at each cue. Confirm that the displayed footage supports the sentence being spoken.
In the Sol/Astra test, the rebuilt sequence kept the five-project structure, racing demo and Codex setup graphic. It retained the narration and editable text and graphics. The font differed, and some moving previews began on different frames. Those are concrete review findings: acceptable for a fresh explanation, but unfinished if the brief requires a faithful visual match. See the comparison from 2:11.
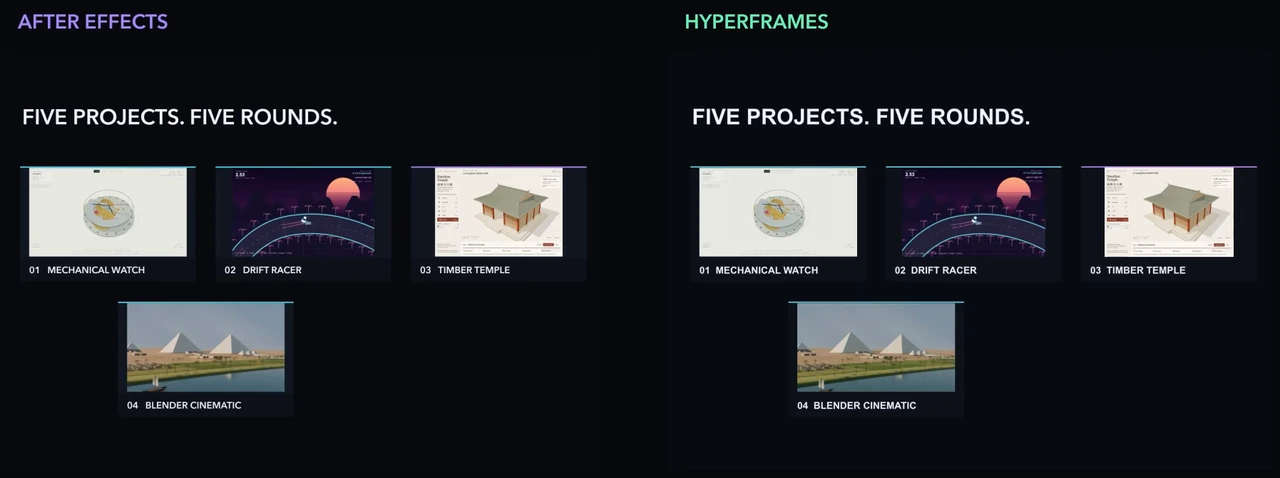
Use separate feedback for content and timing. “Use the mechanical-watch recording for this card” fixes a source-selection problem. “Reveal the card as the project name begins” fixes synchronization. “Match the reference font” fixes visual consistency. Combining all three into “make it closer” makes the next revision harder to judge.
Build diagrams around the order of the explanation
A diagram works best when it answers a question the narration is already raising. In the second test, that question was how Opus, Cursor, Blender, Unreal Engine and Higgsfield fit together. Showing all five names at once would give the viewer another list to decode while listening.
The useful sequence was to establish the coordinator first, then reveal the tools and their outputs. Opus in Cursor coordinated the work; Blender made geometry; Unreal assembled the game; Higgsfield provided artwork. The composition used the actual conversation and application recordings, so the diagram connected labels to evidence rather than relying on generic icons. Watch the example from 3:04.
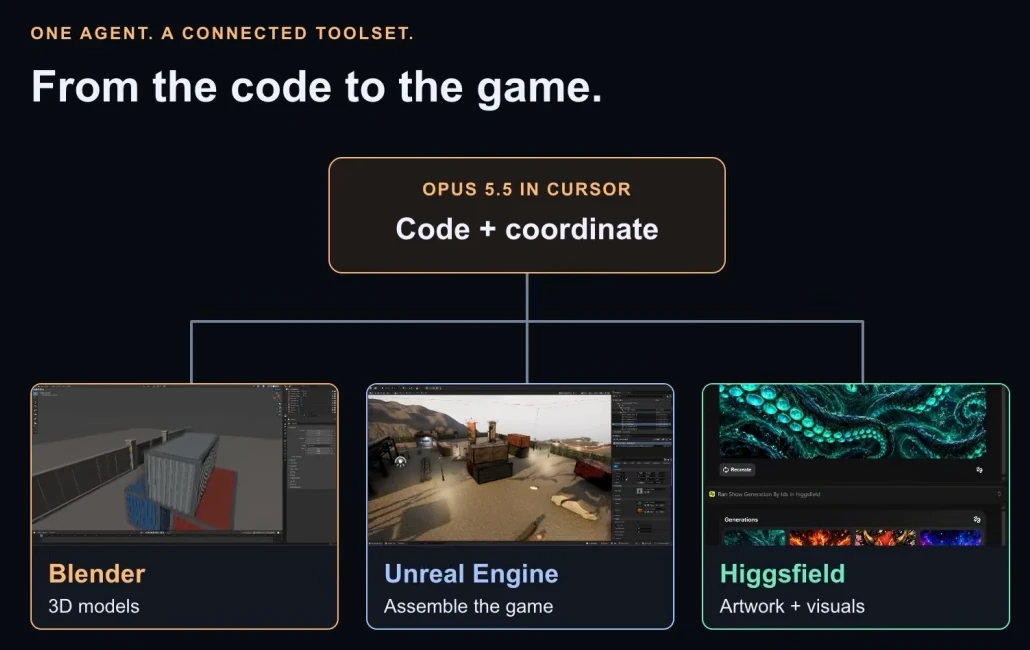
For your own workflow explanation, write one plain sentence for each connection: “This tool produces this asset, which is used here.” Then decide when that connection should appear. Keep the coordinator visible long enough for later branches to have a clear parent. A viewer should not have to remember a node that vanished before its output appeared.
After the first pass, watch without pausing. If you understand the diagram only when inspecting a still, it may be too dense or too fast. Reduce competing movement, hold a relationship longer, or split the explanation into two scenes. The source supports one short diagram sequence; a full episode will need the same review across many scenes and transitions.
Troubleshoot layout, framing and source selection
Use npx hyperframes lint for structural feedback while the agent is building the composition. After the edit is ready, run the full check and review snapshots from the project directory:
npx hyperframes check --json
npx hyperframes snapshot --review
The current checking reference describes these checks and review snapshots. Fix reported errors, and inspect whether browser sampling actually ran. A skipped browser pass or zero sampled frames is not evidence that the layout passed. Open the generated snapshot files and inspect the relevant scenes, including transitions.
Automated checks are useful for overflow and contrast. They cannot decide whether a screen recording is the right evidence for a sentence. The source tests needed both kinds of review: a setup sample had clipped captions and poor text contrast, while the actual project clips needed tighter screen crops and an adjusted presenter inset. See the revision discussion at 3:58.
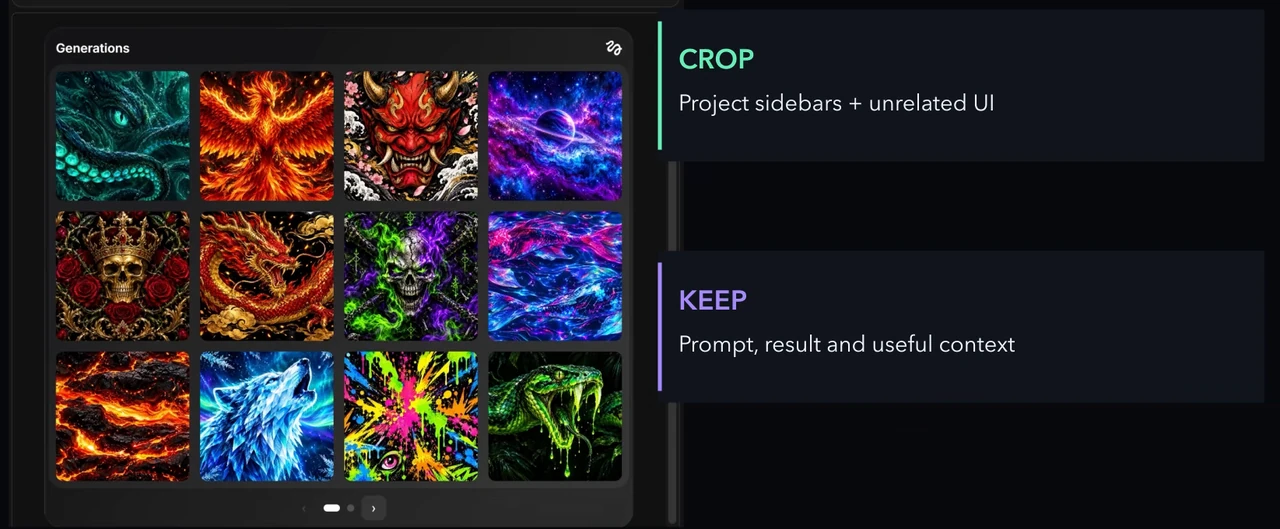
When a screenshot is hard to read, identify why. If it contains a useful result surrounded by project sidebars, crop the irrelevant UI. If the selected result itself has tiny text, give it more room or use a detail shot. Enlarging a whole application window usually enlarges the distractions too.
Check the presenter inset separately. It should leave the evidence and labels visible throughout the passage, including when new cards appear. Review the composition at the size people will actually watch it. A label that fits inside a box on a large monitor can still be unreadable on a phone.
When captions clip, fix the size, line breaks or available space. When contrast is poor, change the foreground/background relationship. When the wrong footage appears, replace the source selection. These are different faults, and a single request to “improve the layout” may leave the real problem untouched.
Preview, export and verify the exported file
Once the checks and still-frame review are satisfactory, run the preview and use the project URL it prints:
npx hyperframes previewPlay the whole passage with sound. You can continue editing the same project in the HyperFrames desktop app if you prefer; the source tests used the browser preview. Keep the distinction clear when comparing your own setup with the recorded results.
After approving that preview, render an MP4:
npx hyperframes render --output narrated-clip.mp4The rendering guide documents this basic command. Set the intended resolution and frame rate in the composition and verify the output matches them. The source clips were exported at 1080p and 30 fps; those measured outputs are not a guarantee about every project’s defaults.
Open the exported file itself. Check the first and last spoken words, the important reveals, the ending hold and the audio. Compare an obvious spoken cue near the beginning and another near the end with the source. If you detect a mismatch, investigate whether it is a fixed offset, a cut error or increasing drift before moving the whole track. Listening and lip-sync inspection are useful checks; they do not justify a claim of zero measurable offset without an actual measurement.
The team’s checks found no measurable audio offset in the two tested exports. That mattered because an earlier After Effects episode had needed an audio-offset correction. It establishes a result for those files, not permanent immunity from sync errors. The export discussion starts at 4:35.
Compare the complete editing job before changing workflows
Record four times separately: preparing the inputs, constructing the scenes, reviewing and revising, and exporting. The roughly one-minute HyperFrames figures in the source refer to local exports of the two short clips on the test Mac. They exclude the work before the render.
Ron also described After Effects jobs taking at least about half an hour in the team’s experience. The workloads were not matched, so those observations cannot support a thirty-times-faster full-episode claim. Compare equivalent passages with the same required finish, then include the time it takes to make a later correction.
Before calling the project reusable, change one label and one cue. Can you find the editable element, make the change without rebuilding unrelated scenes, and export a correct revision? That tests the benefit you wanted from a shared project. Saving only the MP4 throws away that part of the result; retain the composition, media, fonts and brief together.
The earlier After Effects work also used arrows and outlines to explain the mechanical watch, plus evidence screenshots and animated highlights. It still needed editorial revisions: separating images from their labels, adjusting reveals and correcting the Dots export’s audio offset. Carry those review requirements into either tool.
After Effects remained Superbash’s established full-episode route. The team had already used it for a nearly seven-minute Sol comparison and an almost six-minute Dots episode, and had accumulated Envato templates and visual instructions. Those references reduce the work of communicating the desired style. HyperFrames may also benefit from reusable references, but this test did not replace that entire library. See the workflow decision from 5:00.
Use your first short clip to decide where HyperFrames earns a place: a timed explanation, an editable diagram or a section built from existing recordings. Expand when that work survives revisions and export checks. Your next milestone is a reliable section of an episode, with readable evidence and correct sound, that you can still edit tomorrow.